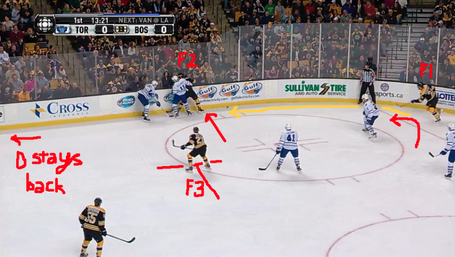
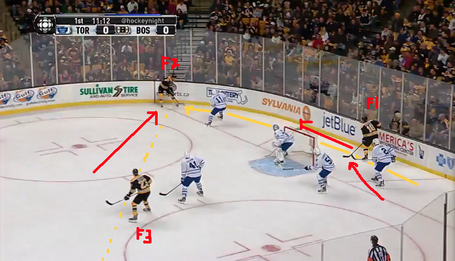
What is the 1-2-2 forecheck, and why use it?
A good video of the basic mechanics of the 1-2-2 can be found at Coach Nielsen Hockey Drills, which is a great site for people looking to understand some basic whiteboard plays, not to mention get a few ideas for drills. Give this one a watch for a good overview:
Another version of that with drawings was completed by dawgbone over at Copper 'n Blue. I'll let you do the background reading and viewing on your own, but, as dawgbone puts it, the basic idea behind the play is thus:
There’s a triangle of your players near the top of the zone on the same side as the puck. This provides extra pressure and puck support and allows you to potentially out man the opposition. The drawback is that you are susceptible to passes that go back across as you are rotating.
When To Use The 1-2-2
Typically, a dump-in is a last-resort play to keep the puck moving forward. Some coaches prefer to have the forwards pass back to the D in the neutral zone to avoid turning over the puck (particularly in Europe), but a lot of players and coaches prefer to keep the forward momentum going for the players and puck.
Anyone who is anyone will tell you that having room to skate the puck over an opponent's blue line with speed is the preferred way of getting into the offensive zone for a chance on net. Advanced stats know it and coaches know it. The truth is, however, that most NHL defencemen are good enough with their gap control that this a lot easier said than done. Heck, it's even true of the Leafs, some nights.
So why is the Bruins' 1-2-2 effective against the Leafs?
Even on a good night, the Leafs are bad at puck retrieval - particularly along the boards. The Leafs' D isn't a particularly bruising group outside of Dion Phaneuf (and Cody Franson on occasion), and most of the Leafs' top six forwards have what you might call 'mild interest' in battling for pucks. Joffrey Lupul and James van Riemsdyk are probably the best of the bunch there, and while David Clarkson has shown some ability in this regard, he is in and out of the Leafs' top six on a game-by-game basis. Same goes for Mark Fraser on the back end. As a team, the Leafs are pretty happy to arrive second to a puck, try to get a hit in, and box out opponents in their own end. This strategy doesn't usually work so well for the Leafs against the Bruins, and they wind up getting pushed around in close to the wall.
Although I'd bet the Bruins have plenty of good carry-in entries into the Leafs' zone, the boys from Boston are also pretty happy to chase down a puck thrown into a corner, knowing that the Leafs will likely give them some space to work with along the wall.
Three types of attempted zone exits:
A defender who reaches a dump-in first has three basic options when facing the 1-2-2:
1) Make a quick pass to a W or C who waits around the strong-side hash marks
2) Reverse the puck (typically behind the net) to a D, W, or C who is already sitting open
3) Try to carry the puck briefly and then chip it out of the zone
Here is option 1, wherein the Leafs' defender tries to clear a rebound up the boards to a winger who should be waiting at the hash marks, but he isn't.
On this play, Reimer has just made a save off a point shot (from the D now off-screen), and Mark Fraser, under siege from F1 down low, decides to simply backhand the puck up the strong-side boards. Carter Ashton had just made a hit at the point and wasn't at the hash marks where he might be expected to receive the puck. Jay McCelment pins F2 to the boards, but because F2 has the inside step on him, F2 manages to play it to F3 (who doesn't go further than the dot towards the boards), the outlet man. F3 shows great awareness of the ice, tipping the puck back to the D for another shot. So: Fraser doesn't take his time, Ashton is out of position, and McClement covers for him. Kulemin doesn't want to over-commit to the far side of the ice knowing that a point man is open, but he could maybe have tied up F3. There are breakdowns by the Leafs, for sure, but the 1-2-2 works well. F1 chases the puck, F2 supports, F3 is the outlet. Shot on goal.
The second type of zone exit is when the defender tries to reverse the puck, so that F1 doesn't get a hold of it.
So here, F1 has chased his dump-in to the corner on the right side of the screen. Fraser gets there first, and sends a weak backhand around towards the weak-side boards, looking for either a defence partner who isn't there (Jake Gardiner, who is at this point at the side of the net, was in the same corner) or looking for a forward who was nowhere near being able to get there. Carter Ashton? Nowhere to be found. Jay McClement is doing his best to cover, but it's just not enough. F2 picks this puck up with plenty of time and space to put a pass by F3 to the point for another shot on net. Big credit to F2 for reading the reversal and hustling over to the other side before anyone else.
The third option is to try and skate the puck out and/or lift the puck out of the zone. This should generally be thought of as the least likely to generate offence. If you're skating the puck out and have between 1 and 3 opponents bearing down on you, you generally won't get far without just throwing the puck away.
In this one, Jake Gardiner (not in screen) fakes carrying the puck to the weak side, effectively reverses the puck to Franson, who, instead of passing the puck, decides to skate the puck to the hash marks of the strong side, and to chip it off the glass and out. F1 (who I forgot to label) is coming straight for him, while F2 and F3 close the gap on JvR and Kessel, who are no longer great pass outlets. Franson makes the safe play, but the Bruins just wind up with the puck again.
...So?
The Bruins are stronger than the Leafs in any zone close to the wall. Knowing this, they forecheck aggressively, limiting the Leafs' ability to break out and use their top-six speed. One last note that I'll add is that the Bruins' D pinch a LOT, and all this aggressive forechecking can be risky. That said, they know that F3 will always have the good sense to hinge back and give the other defenceman an outlet, should the need arise. In other words, their D have a lot of trust in their forwards to help out.


Comment Navigation & Markdown
Navigation
cc to focus on comments section
c next comment
x previous comment
z next unread comment
Inline Styles
Bold: **Text**
Italics: *Text*
Both: ***Text***
Strikethrough: ~~Text~~
Code: `Text` used as sarcasm font at PPP
Spoiler: !!Text!!